If you read this article, then you’ve probably heard about GraphQL. If not, you may find this material too tech-specific. Perhaps, hiring a dedicated software development team to build API will work out to be a better way out for you. In case Spring Boot, GraphQL, and MongoDB don’t awaken confusion, keep on reading to learn thee easy way to start using GraphQL in your API.
Here we will speak about how to create simple Spring Boot API with GraphQL and MongoDB. GraphQL — is the technology that is poised to replace, or at least completely change the way APIs are designed and presented. It brings us a set of super good features and solves some problems that are present in REST architecture:
- The problem that is present in REST — Under- and Overfetching is removed with GraphQL. Overfetching— takes place when more data is fetched than required. Underfetching — opposite, takes place when not enough data is delivered upon fetching. It solved by GraphQL — you get exactly data that you requests.
- Round trips and Repeat Trip Times — usually, when you are working with web, you need to show the user some sort of data. Imagine — we have kind of social portal, and we need to display on the page user’s name, surname, names of his friends and recent articles posted by user’s friends. So how would you do this with REST? … Of course you have to pull the User information itself. Than you need to get all user’s that are friends of the user. Than, for each friend you need to pull latest articles posted by him. So there are lot’s of round trips from client to server. And that’s definitely not good. With the GraphQL — as was already mentioned — you get exactly what you want, within one request. Isn’t this kind of magic? ?
And here we are going to speak and build the simple API using Spring Boot and GraphQL and see how easy it could be.
Let’s start, it should be very interesting!
A t the very beginning our project has only pom.xml, with following content:
<parent>
    <groupId>org.springframework.boot</groupId>
    <artifactId>spring-boot-starter-parent</artifactId>
    <version>1.5.8.RELEASE</version>
</parent>
<dependencies>
    <dependency>
        <groupId>org.springframework.boot</groupId>
        <artifactId>spring-boot-starter-web</artifactId>
    </dependency>
    <dependency>
        <groupId>org.springframework.boot</groupId>
        <artifactId>spring-boot-starter-data-mongodb</artifactId>
    </dependency>
    <dependency>
        <groupId>org.projectlombok</groupId>
        <artifactId>lombok</artifactId>
        <version>${lombok.version}</version>
        <scope>provided</scope>
    </dependency>
    <dependency>
        <groupId>commons-io</groupId>
        <artifactId>commons-io</artifactId>
        <version>${commons-io.version}</version>
    </dependency>
    <dependency>
        <groupId>com.graphql-java</groupId>
        <artifactId>graphql-spring-boot-starter</artifactId>
        <version>3.6.0</version>
    </dependency>
    <dependency>
        <groupId>com.graphql-java</groupId>
        <artifactId>graphql-java-tools</artifactId>
        <version>3.2.0</version>
    </dependency>
    <dependency>
        <groupId>com.graphql-java</groupId>
        <artifactId>graphiql-spring-boot-starter</artifactId>
        <version>3.6.0</version>
    </dependency>
</dependencies>
As you see, we will use MongoDB for this example, and also we added spring-boot-starter-web dependency to the project be MVC. And two GraphQL specific dependencies that will enable our GraphQL support. As well as Lombok library, with the help of which a tones of boilerplate code are removed.
Next thing is to add Main class. Here is nothing specific.
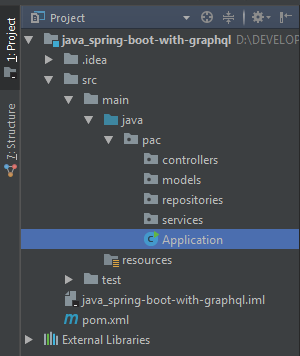
After that let’s add general folder structure for our app. For now we will have 4 folders divided based on their purpose:
- models — to hold our entities;
- repositories — to communicate with database;
- services — to hold our business logic;
- controllers — to listen to the client;
In the models folder we will create two java clasess — User and Article.
package pac.models;
import lombok.*;
import org.bson.types.ObjectId;
import org.springframework.data.mongodb.core.mapping.Document;

import java.util.Date;
import java.util.List;

@Data
@AllArgsConstructor
@NoArgsConstructor
@Builder
@Document(collection = "users")
public class User {

    private ObjectId id;

    private String name;
    private Integer age;
    private Date createdAt;
    private String nationality;
    private List<String> friendsIds;
    private List<String> articlesIds;
}
So, user will hold List of ids of his friends(that are of type User too), as well as List of ids of own articles;
The article itself, will have own specific information plus reference to the author by authorId;
package pac.models;

import lombok.AllArgsConstructor;
import lombok.Builder;
import lombok.Data;
import lombok.NoArgsConstructor;
import org.bson.types.ObjectId;
import org.springframework.data.mongodb.core.mapping.Document;

@Data
@AllArgsConstructor
@NoArgsConstructor
@Builder
@Document(collection = "articles")
public class Article {

    private ObjectId id;

    private String title;
    private Integer minutesRead;
    private String authorId;
}
Since we are working with MongoDB we need to create Data Access Objects(DAO). So, let’s create two interfaces that will extent PagingAndSortingRepository:
- UserRepository
- ArticleRepository
Along with repositories we need to add a business logic layer to the app:
So, in the services folder let’s add two interfaces:
- UserService
- ArticleService
And create folder called “implementation” that will hold all our classes with business logic, and implement services interfaces:
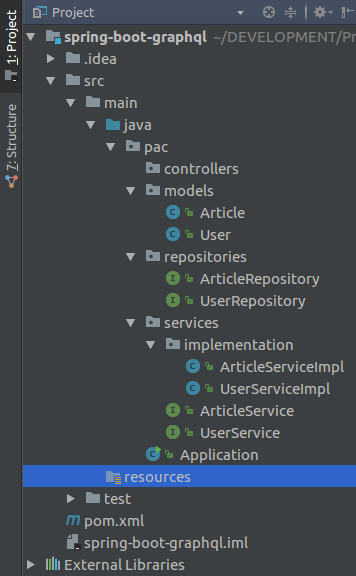
For the structure of the project looks like this;
The ArticleServiceImpl and UserServiceImpl classes for now just do nothing except of implementing ArticleService and UserService interfaces.
What we need to do next is:
- Set up the connection to DB
- Fill the DB with dummy objects
So, next think is to add to the resource folder new file called application.yml, and specify our connection details to MongoDB that is running locally.
server:
  port: 8000
spring:
 data:
  mongodb:
   database: graphql
   host: localhost
   port: 27017
Also, we’ll create some test data to work with.
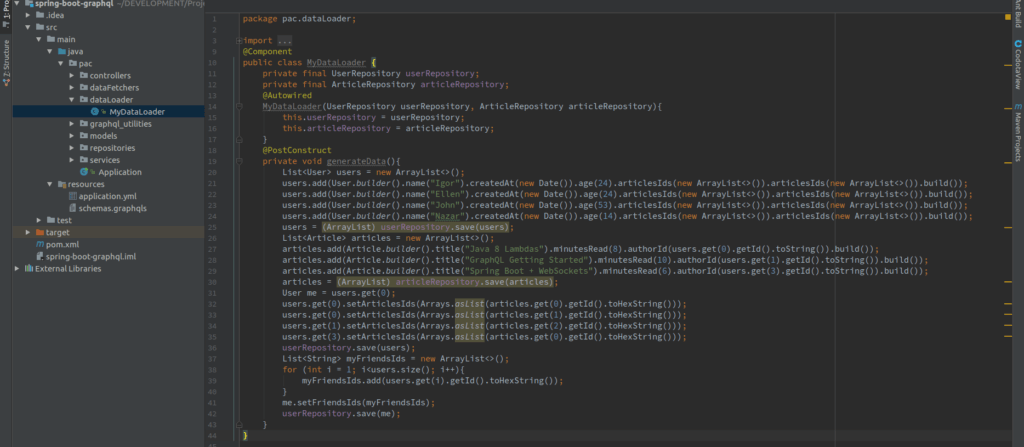
We will have 4 users, and each user will have 1 article. In this way we would see how easy GrapQL fetches needed information. For this we add folder called dataLoader and write some code to generate data.
So, the method generateDate is called on application init, and saves data to the MongoDB.
Now is time to GraphQL!
The first thing we are going to do is to add the models.graphqls file, and store it in the resource folder;
Here we will define our schemas.
schema {
    query : Query
}

type Query {
    users: [User]
    user(id: String): User
}

type User {
    id: String
    name: String
    age: Int
    nationality: String
    createdAt: String
    friends: [User]
    articles: [Article]
}

type Article {
   id: String
   title: String
   minutesRead: Int
}
Schema — means what kind of request we define in the application (query/mutations..etc)
Query — here we define our “endpoints”. So we want two API calls — one →to get list of all users. And the second one → to get single person info by ID;
User — this is our model we want to be able to fetch. So in the request we can specify that we want to get id, name, age, nationality, createdAt, friends, articles. So these are associated with User fields that we can pull from the server.
Article — also, it’s a model of our article, that may have Id, title, and minutesRead.
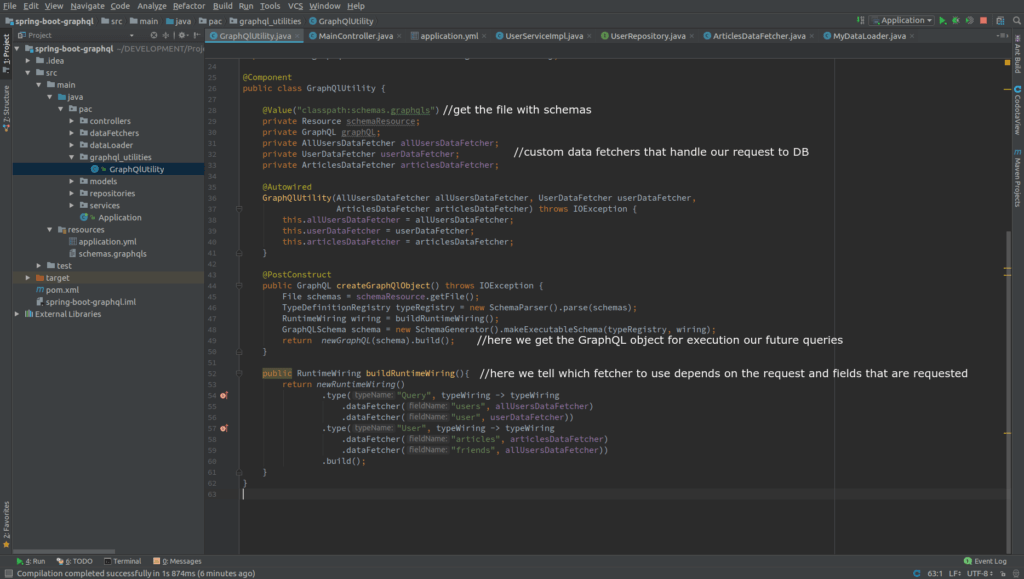
Next thing we’re going to add is our custom GraphQlUtility. We need an instance of the GraphQl to be able to execute queries. So, let’s create folder graphql_utilities. In this folder we will have only one class called GraphQlUtility, that will build the graphQl object, that we will use in our controller to execute queries:
I already created few custom data fetchers that are located in the dataFetchers folder. We have 3 data fetchers:
- AllUsersDataFetcher — uses when we request all users or their friends;
- UserDataFetcher — uses for requesting single user by ID;
- ArticlesDataFetcher — uses for getting articles of each user;
AllUsersDataFetcher
@Component
public class AllUsersDataFetcher implements DataFetcher<List<User>> {

    private final UserService userService;

    @Autowired
    AllUsersDataFetcher(UserService userService){
        this.userService = userService;
    }

    @Override
    public List<User> get(DataFetchingEnvironment env) {
        User user =  env.getSource();
        List<User> friends = new ArrayList<>();
        if(user !=null){
            friends = userService.findByIdIn(user.getFriendsIds());
        }else {
            friends = userService.findAllUsers();
        }
        return friends;
    }
}
UserDataFetcher
@Component
public class UserDataFetcher implements DataFetcher<User> {

    private final UserService userService;

    @Autowired
    UserDataFetcher(UserService userService){
        this.userService = userService;
    }

    @Override
    public User get(DataFetchingEnvironment env) {
        Map args = env.getArguments();
        User user = userService.findOneById(new ObjectId(String.valueOf(args.get("id"))));
        return null;
    }
}
ArticlesDataFetcher
@Component
public class ArticlesDataFetcher implements DataFetcher<List<Article>>{

    private final ArticleService articleService;

    @Autowired
    ArticlesDataFetcher(ArticleService articleService){
        this.articleService = articleService;
    }

    @Override
    public List<Article> get(DataFetchingEnvironment env) {
        User user = env.getSource();
        List<String> articleIds = new ArrayList<>();
        if(user!=null){
            articleIds = user.getArticlesIds();
        }
        List<Article> articles = articleService.findAllUserArticles(articleIds);
        return articles;
    }
}
Now, let’s add one controller that will have only one @PostMapping using which the client will be communication with the server.
@RestController
public class MainController {

    private GraphQL graphQL;
    private GraphQlUtility graphQlUtility;
    @Autowired
    MainController(GraphQlUtility graphQlUtility) throws IOException {
        this.graphQlUtility = graphQlUtility;
        graphQL = graphQlUtility.createGraphQlObject();
    }

    @PostMapping(value = "/query")
    public ResponseEntity query(@RequestBody String query){
        ExecutionResult result = graphQL.execute(query);
        System.out.println("errors: "+result.getErrors());
        return ResponseEntity.ok(result.getData());
    }

}
And that’s basically it! We have all needed classes and settings to be able to make our first request using GraphQL!
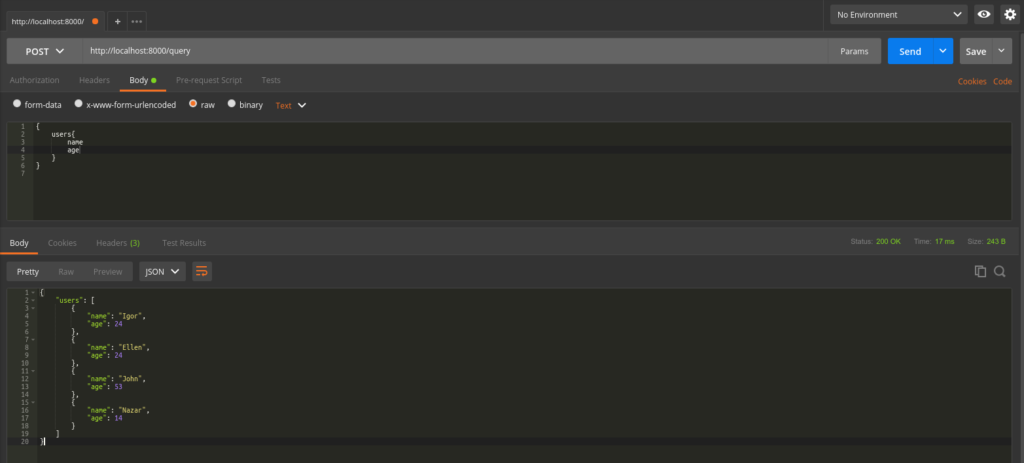
Here is how the simple request to get all users and get only their names and ages looks like.
We specified query — users and our server knows what we want from him, because in the GraphQlUtility we told that if request is made to “users” → than the allUsersDataFetcher is loaded. And so on.
The output of the above query is:
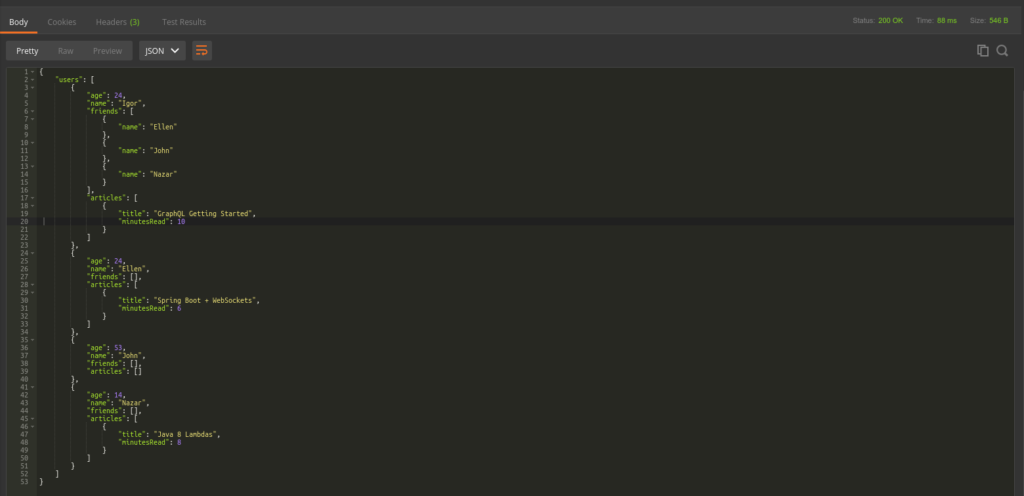
Now let’s try to get all users with age, name, createdAt, friends and articles. Within friends object we would want to retrieve only names of our friends. And within article — title and minutesRead. The request for this will look like this:
{
    users{
       age
       name
       friends{
         name
       }
       articles{
         title
         minutesRead
       }
     }
 }
And here what we get from the server in response to our request:
Magic!
That’s it. This is how easy to start using GraphQL in your API. Thank you for reading!
The source code you can find on my GitHub account.
As well you can find it on Oril Software GitHub.
