Overview
If you are reading this article I assume you are a bit familiar with Spring Boot and building API using it. Because the main purpose of this article is to show you a simple way how to make your API more secured.
But before we get started I want to be sure that all of you have some basic knowledge of JSON Web Tokens (JWT). So here is the link to the official website where you can dive deeper into JWT theory.
The official definition of JWT sounds like this:
From history
JSON Web Token (JWT) is an open standard (RFC 7519) that defines a compact and self-contained way for securely transmitting information between parties as a JSON object. This information can be verified and trusted because it is digitally signed. JWTs can be signed using a secret (with the HMAC algorithm) or a public/private key pair using RSA.
Sources
Let’s proceed to a practice part. I’ve created a new maven project and my pom.xml file contains the following dependencies:
<parent>
        <groupId>org.springframework.boot</groupId>
        <artifactId>spring-boot-starter-parent</artifactId>
        <version>1.5.7.RELEASE</version>
    </parent>

    <dependencies>
        <dependency>
            <groupId>org.springframework.boot</groupId>
            <artifactId>spring-boot-starter-web</artifactId>
        </dependency>

        <dependency>
            <groupId>org.springframework.boot</groupId>
            <artifactId>spring-boot-starter-data-mongodb</artifactId>
        </dependency>

        <dependency>
            <groupId>com.auth0</groupId>
            <artifactId>java-jwt</artifactId>
            <version>3.2.0</version>
        </dependency>

        <dependency>
            <groupId>org.projectlombok</groupId>
            <artifactId>lombok</artifactId>
            <version>1.16.16</version>
            <scope>provided</scope>
        </dependency>

        <dependency>
            <groupId>com.fasterxml.jackson.core</groupId>
            <artifactId>jackson-databind</artifactId>
            <version>2.8.8</version>
        </dependency>

    </dependencies>

    <build>
        <plugins>
            <!-- Package as an executable jar/war -->
            <plugin>
                <groupId>org.springframework.boot</groupId>
                <artifactId>spring-boot-maven-plugin</artifactId>
            </plugin>

        </plugins>
    </build>
As you noticed we will be using MongoDB as database; jackson-databing for binding request and response data into JSON format; lombok for generating getters, setters etc.
Let’s create application.yml in the resources folder and add the following content:
spring:
  data:
    mongodb:
      database: springjwt
      host: localhost
      port: 27017
      repositories:
        enabled: true
Next we need to create some default package, I will call it com.jwt.example and add main class which will be responsible for starting our Spring Boot application. I will call it Application, but you can give it any name you like.
@SpringBootApplication
public class Application {
    public static void main(String[] args) throws Exception {
        SpringApplication.run(Application.class, args);
    }
}
If you did everything right then our appllication should be started successfully. But it does not do anything yet, so let’s continue and add some more packages into our default package: configuration, controller, model, repository, service.
In the model package add simple User class with following content:
@Data
@NoArgsConstructor
@AllArgsConstructor
@Builder
@JsonIgnoreProperties(ignoreUnknown = true)
public class User {

    private ObjectId id;
    private String name;
    private String email;
    private String password;
}
All annotations that you can see is added from lombok package that was mentioned before. User needs to be saved and fetched from database, so let’s add UserRepository interface which extends MongoRepository. We will not add any methods to this interface because MongoRepository already have built-in all CRUD operations.
@Repository
public interface UserRepository extends MongoRepository<User,
ObjectId> {
}
Next thing we need to do is to add UserService class with two methods saveUser and getUser.
@Service
public class UserService {

private UserRepository userRepository;
private TokenService tokenService;

@Autowired
UserService(UserRepository userRepository, TokenService tokenService) {
this.userRepository = userRepository;
this.tokenService = tokenService;
}

public User getUser(ObjectId userId) {
return userRepository.findOne(userId);
}

public String saveUser(User user) {
User savedUser = userRepository.save(user);
return tokenService.createToken(savedUser.getId());
}
}
These two methods are pretty simple. GetUser() just finds user in database using injected userRepository class. SaveUser() saves user to database. NOTE: saving user’s password without hashing it is a bad practice, I just skipped it because it’s not a scope of this topic. After saving user we create a token by calling tokenSerice.createToken() method. TokenService is not in our project yet, so I will add it into service package:
@Service
public class TokenService {

public static final String TOKEN_SECRET = "s4T2zOIWHMM1sxq";

public String createToken(ObjectId userId) {
try {
Algorithm algorithm = Algorithm.HMAC256(TOKEN_SECRET);
String token = JWT.create()
.withClaim("userId", userId.toString())
.withClaim("createdAt", new Date())
.sign(algorithm);
return token;
} catch (UnsupportedEncodingException exception) {
exception.printStackTrace();
//log WRONG Encoding message
} catch (JWTCreationException exception) {
exception.printStackTrace();
//log Token Signing Failed
}
return null;
}

public String getUserIdFromToken(String token) {
try {
Algorithm algorithm = Algorithm.HMAC256(TOKEN_SECRET);
JWTVerifier verifier = JWT.require(algorithm)
.build();
DecodedJWT jwt = verifier.verify(token);
return jwt.getClaim("userId").asString();
} catch (UnsupportedEncodingException exception) {
exception.printStackTrace();
//log WRONG Encoding message
return null;
} catch (JWTVerificationException exception) {
exception.printStackTrace();
//log Token Verification Failed
return null;
}
}

public boolean isTokenValid(String token) {
String userId = this.getUserIdFromToken(token);
return userId != null;
}
TokenService is a class where all stuff related to JWT is happening. Let me explain some parts of this code.
TOKEN_SECRET is a random generated string, you can use any string you like.
createToken() is main method which creates a token based on HMAC256 algorithm. As you can see I added userId into withClaim() method. This method let us to add any info into token and this data can be fetched from token after decoding it. You probably noticed that I added one more claim “createdAt” which is a Date object. This is done with one puprose — to make token string be different everytime. Because if you add only userId which is always the same for one user, token will be the same, so I added a Date object which is always unique at any moment of time. If token cannot be created for some reason then exception will be thrown.
isTokenValid() method just returns true or false if token is valid or not. It calls getUserIdFromToken() method which performs decoding of token with the same algorithm and token secret. If token is valid then decoder can pull userId from token in other case exception will be thrown and null will be returned.
We are almost done. One thing is left to do is to tell our Spring Application which routes (request mappings) should be used with token and which should be available for all users. To do this we need to create JWTFilter class that extends GenericFilterBean class and override method doFilter(). Also we need to add @Configuration annotation to this class. Let’s look into the code and I will explain what is going on here.
@Configuration
public class JWTFilter extends GenericFilterBean {

private TokenService tokenService;

JWTFilter() {
this.tokenService = new TokenService();
}

@Override
public void doFilter(ServletRequest req, ServletResponse res, FilterChain filterChain) throws IOException, ServletException {
HttpServletRequest request = (HttpServletRequest) req;
HttpServletResponse response = (HttpServletResponse) res;
String token = request.getHeader("Authorization");

if ("OPTIONS".equalsIgnoreCase(request.getMethod())) {
response.sendError(HttpServletResponse.SC_OK, "success");
return;
}

if (allowRequestWithoutToken(request)) {
response.setStatus(HttpServletResponse.SC_OK);
filterChain.doFilter(req, res);
} else {
if (token == null || !tokenService.isTokenValid(token)) {
response.sendError(HttpServletResponse.SC_UNAUTHORIZED);
} else {
ObjectId userId = new ObjectId(tokenService.getUserIdFromToken(token));
request.setAttribute("userId", userId);
filterChain.doFilter(req, res);

}
}

}

public boolean allowRequestWithoutToken(HttpServletRequest request)
if (request.getRequestURI().contains("/register")) {
return true;
}
return false;
}
}
Let’s go step by step through doFilter() method. First of all we are casting request and response to HttpServletRequest and HttpServletResponse to have access to some http methods. Then we get a token from “Authorization” header. As you may guess we will pass our token as Authorization header with each request that requires token. After that we check if request method is “OPTIONS” and if so we send success response. This is need because before sending request to some endpoint some browsers send OPTIONS request to be ensure that the request being done is trusted by the server.
By default all requests will be checked for Authorization header, so if we want to skip some routes we should explicitly declare these routes. For this purpose we have added a method allowRequestWithoutToken() where we added “/register” request mapping. So if we’re sending register new user request then method filterChain.doFilter(req, res) will be called. This method is proceeding to the next filter and the last filter in the chain will be our destination request mapping. As we don’t have any other filter then doFilter() method will directly go to our controller which we will add in a minute.
Next step in our doFilter method is checking if token is null or invalid. If so, then Unauthorized response will be sent. If token is valid we’re retrieving userId from token and adding it as an Attribute to the request object. After this we can get userId from attribute in any method in our controller.
Last step is adding our UserController class
@RestController
@RequestMapping("/user")
public class UserController {

private UserService userService;

@Autowired
UserController(UserService userService) {
this.userService = userService;
}

@PostMapping("/register")
public String regiterUser(@RequestBody User user) {
return userService.saveUser(user);
}

@GetMapping("/get")
public User getUser(HttpServletRequest request) {
ObjectId userId = (ObjectId) request.getAttribute("userId");
return userService.getUser(userId);
}
}
Nothing special here, just calling userService methods, except getting userId from request attribute in getUser()method.
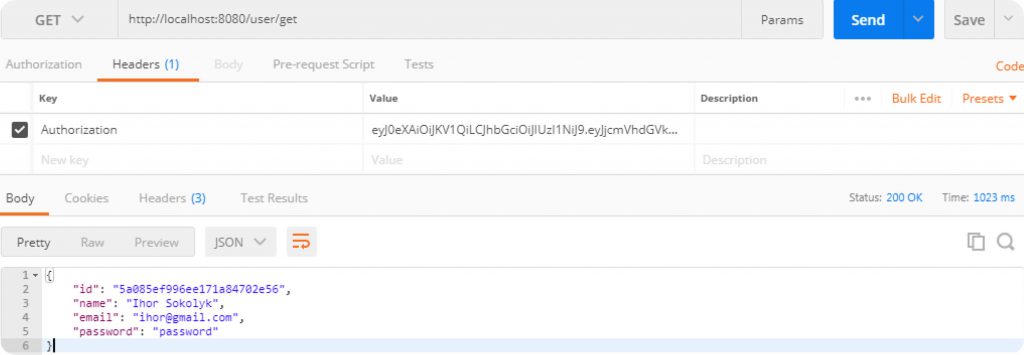
Congratulations! We are done. It’s time to test our API. Restart your Application and open Postman to send some request. Let’s create new user by sending POST request to https://localhost:8080/user/register with the following request body:
{
“name”: “Ihor Sokolyk”,
“email”: “ihor@gmail.com”,
“password”: “password”
}
We should get a token in the response body:
“eyJ0eXAiOiJKV1QiLCJhbGciOiJIUzI1NiJ9.eyJjcmVhdGVkQXQiOjE1MTA0OT
gwNDIsInVzZXJJZCI6IjVhMDg1ZWY5OTZlZTE3MWE4NDcwMmU1NiJ9.Q_kKBHy5A-pKp-NjaottM6QybwnTZ4QD2XBzOdDSVcs”
Now copy this token and let’s try to get just created user by making GET request to https://localhost:8080/user/get, but do not forget to add our token as Authorization header:
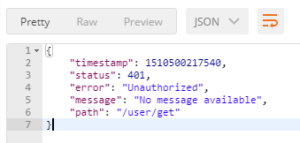
If you don’t pass token or remove some character from it then you should get 401 Unauthorized error:
Conclusion
Conclusion. Now you know how to use JWT tokens and how to secure your API. But you can play around with it and make it more complicated, for example save all tokens to database and implement logging from different devices functionality.
Thank you for reading this article. If you have any questions or notes please feel free to leave a comment. You can check all sources on my GitHub. As well you can check it on Oril Software GitHub.