Liquibase is a DB migration and change operation tool developed specifically to help software developers change their databases and move seamlessly through the development and testing stages. The role of this tool is to hold all the changes made to a particular database in a single file named changelog. It also allows for loading information on a new database, automatically applying all recent changes.
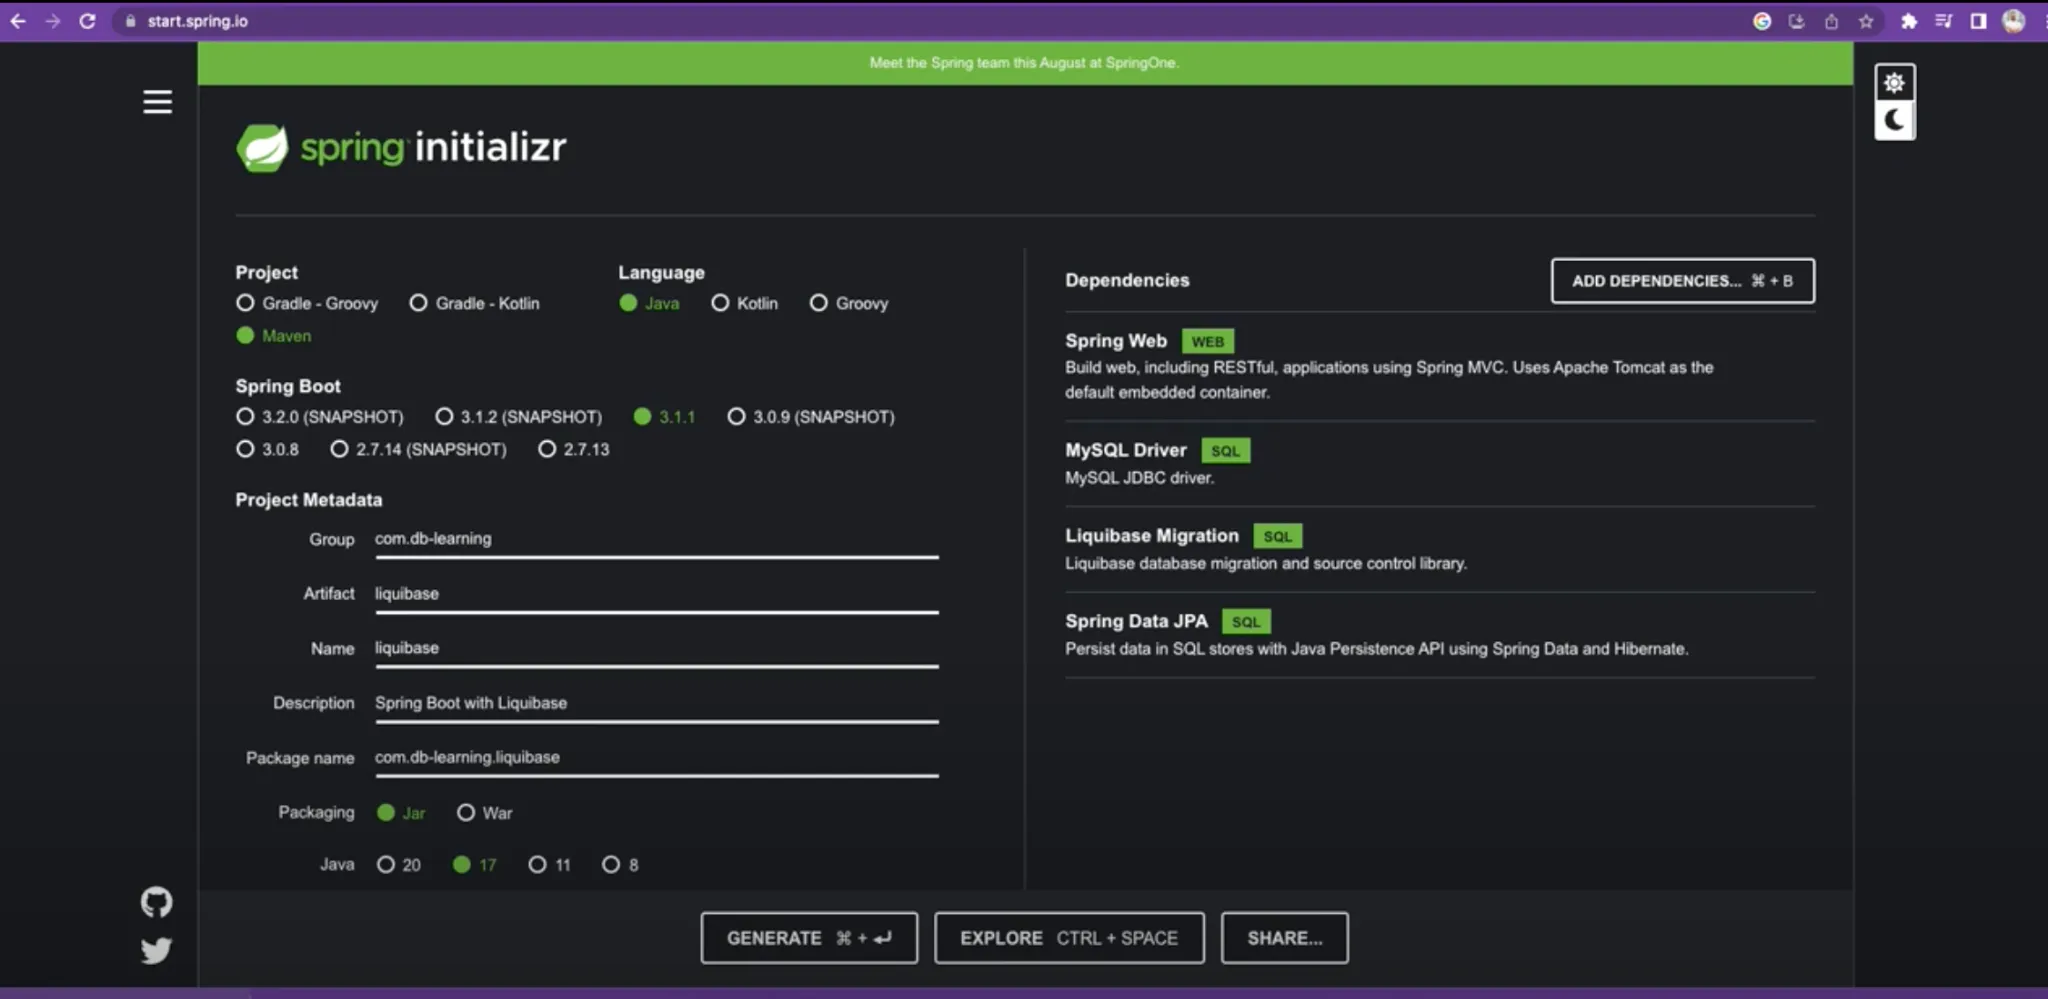
Moreover, Liquibase is open-source software that supports many databases, including PostgreSQL, MySQL, Oracle DB, H2 db, and more. In this guide, we’ll find out how the Liquibase migration tool works and review the case with MySQL. To start, let’s go to the Spring Initializr website and create a simple project.
MySQL Case
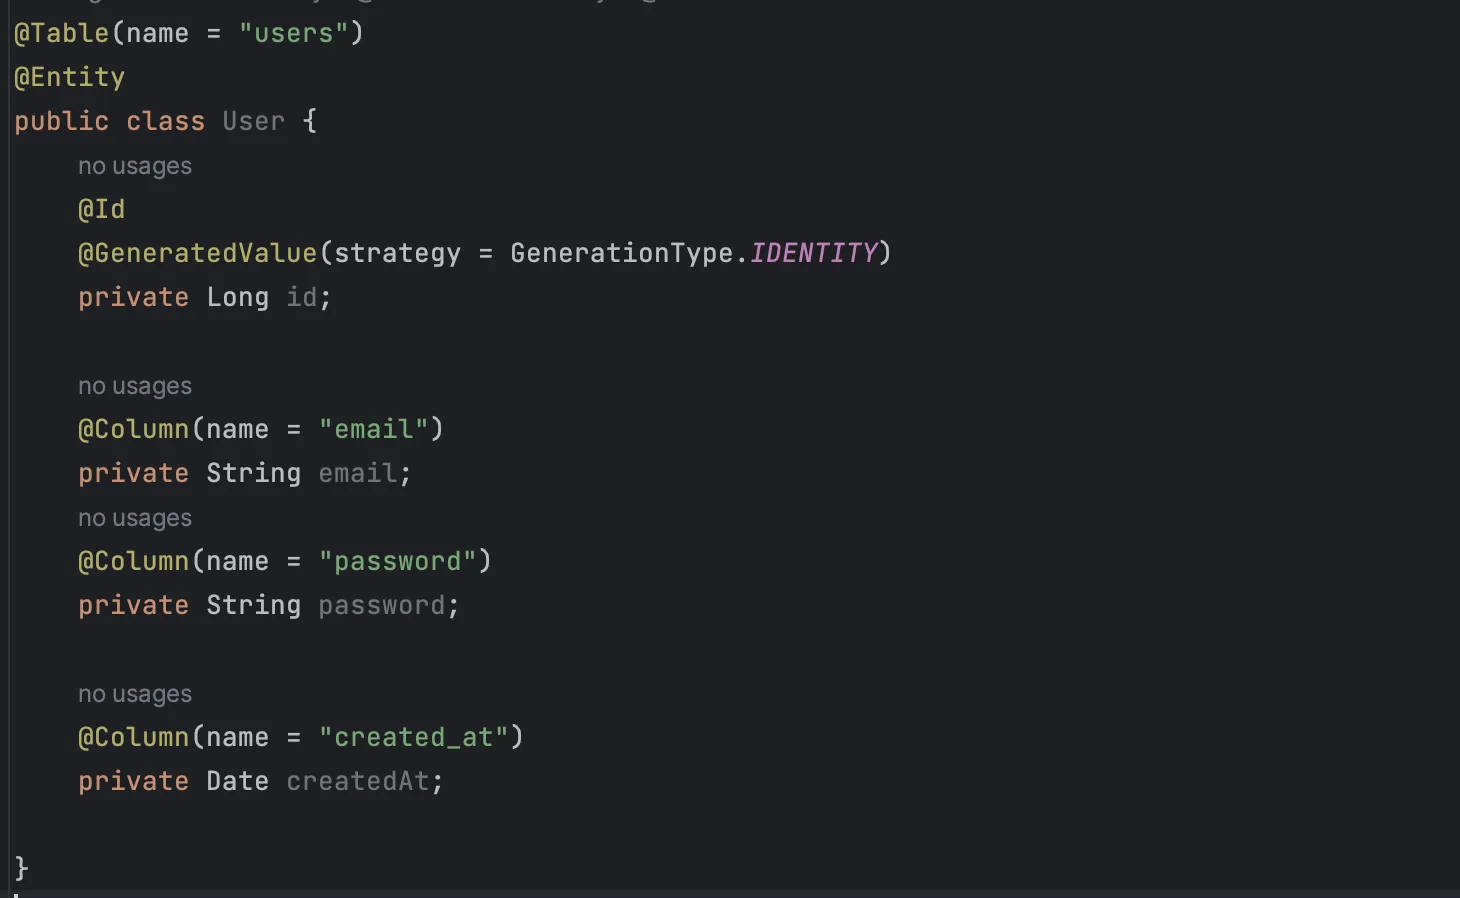
Suppose that you have a MySQL database up and running. Ours is running at the local host and 3306 port. First of all, we create a simple User class.
After that, we need to configure the connection to our database. So go to the application.yml file and configure it.
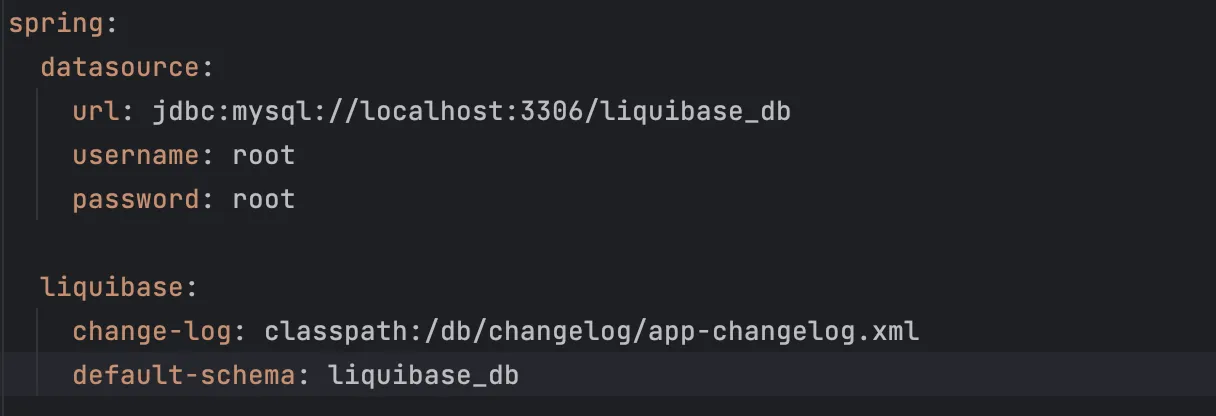
After that, we need to configure the connection to our database. So go to the application.yml file and configure it.
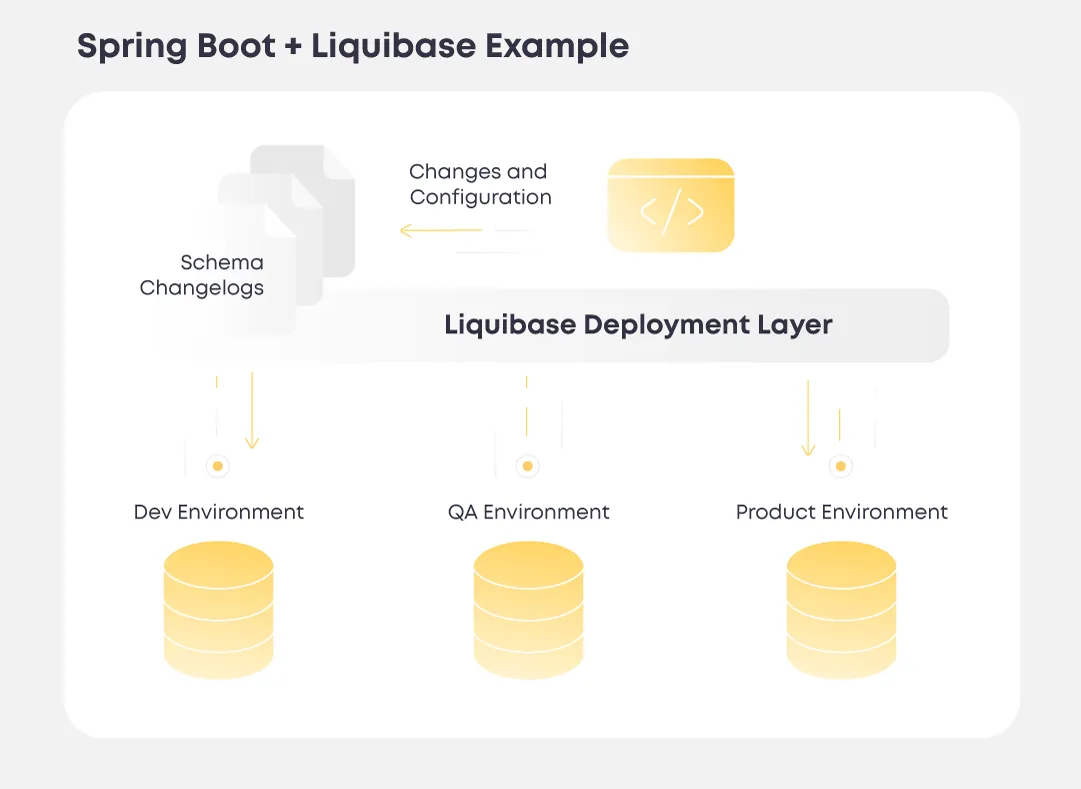
First, we need to have the liquibase_db schema created in our DB instance. Liquibase generally works with xml, yml, json, and sql formats. In this tutorial, we’ll be using SQL format for our scripts.
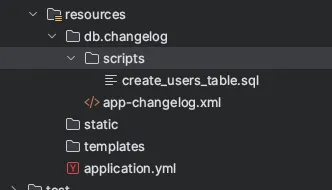
So for Liquibase to start working, we need to create the following folders.
Under the /resources, you need to add the DB/changelog folder. Here we have our main config file that will let Liquibase know where to find our migration scripts. The name of the file should be app-changelog.xml. Let’s review what’s inside.
<databaseChangeLog xmlns="http://www.liquibase.org/xml/ns/dbchangelog"
xmlns:ext="http://www.liquibase.org/xml/ns/dbchangelog-ext"
xmlns:xsi="http://www.w3.org/2001/XMLSchema-instance"
xsi:schemaLocation="http://www.liquibase.org/xml/ns/dbchangelog-ext
https://www.liquibase.org/xml/ns/dbchangelog/dbchangelog-ext.xsd
http://www.liquibase.org/xml/ns/dbchangelog
https://www.liquibase.org/xml/ns/dbchangelog/dbchangelog-latest.xsd">
</databaseChangeLog>
It’s a root file for migrations where we put links to our migration scripts.
First, we create a table for the User class. To do that, create a script file, and name it create_users_table.sql (the name might be anything you want). For better readability, we add an additional folder called scripts and put it there so the folder structure will be the following:
Then we update the app-changelog.xml file and include this script for processing. For that, we just add a single line:

Fill the Script
Now, let’s fill this script with content. It will simply create a table script:
CREATE TABLE IF NOT EXISTS users (
id INT PRIMARY KEY AUTO_INCREMENT,
email VARCHAR(255),
password VARCHAR(255),
createdAt TIMESTAMP
)
Run your application, and Spring Boot should launch script execution by Liquibase. After that, your database will have a table called users.
What’s Next?
Usually, scripts are useful not just for updating data structure but also for fulfilling the data. Imagine you have three environments: local, development, and QA. To work properly and test your app flows, you need to have some data to be present in databases. To achieve this and make it easy, you can also use a migration script. You just create an SQL query to enter any data you want into any table you require. When you launch a new environment, you are safe to state that the database in this environment will have the same data as in other environments, and you can start working/testing your application immediately.
Then do the same. Create a new script, name it insert_into_users.sql, and add the following content:
INSERT INTO users (email, password, createdAt) VALUES
('user1@example.com', 'password1', CURRENT_TIMESTAMP),
('user2@example.com', 'password2', CURRENT_TIMESTAMP),
('user3@example.com', 'password3', CURRENT_TIMESTAMP),
('user4@example.com', 'password4', CURRENT_TIMESTAMP),
('user5@example.com', 'password5', CURRENT_TIMESTAMP);
Also, include this new script in the app-changelog.xml (always do this with new scripts).
<include file="db/changelog/scripts/insert_into_users.sql"/>
After restarting the app, your db table users will have five users inserted.
Column Change
However, you may want to change existing columns. For example, you need to change the column name. This is difficult to achieve without a migration tool like Liquibase. First, update your User class, and change the column name inside the @Column annotation:
@Column(name = "created_at")
private Date createdAt;
Then create a new script, name it change_createdAt_column_name.sql, and add the next line:
ALTER TABLE users RENAME COLUMN createdAt TO created_at;
Include this new script to app-changelog.xml by adding the following:
<include file="db/changelog/scripts/change_createdAt_column_name.sql"/>
And rerun the app. Now your table column is named as created_at, not createdAt as before.
Let’s Go to the Next Use Case
Your app is growing, and you constantly need to add new columns to existing tables without breaking the functionality. And you can also do it with Liquibase.
So update the User class by adding a new property:
@Column(name = "username")
private String username;
Create a new script called add_username_column.sql and add SQL statement to it:
ALTER TABLE users ADD COLUMN username VARCHAR(10);
Include this script in the app-changelog.xml file:
<include file="db/changelog/scripts/add_username_column.sql"/>
Restart the app, and all your existing users will receive a new column called username. But it is null for everyone, which needs to be changed.
All users created before you implemented a username feature won’t have a username under their profile. That’s not what we need. It’s better to show at least some default username for a user and allow them to change it at least once, from default to custom one.
The great thing is that Liquibase allows you to do that. We create a new script that will set a default 10 symbols username for all users with null in the username column.
Create a new script apply_default_usernames_to_users.sql and put this SQL statement:
UPDATE users
SET username = SUBSTRING(MD5(RAND()) FROM 1 FOR 10)
WHERE username IS NULL;
Add this to app-changelog.xml:
<include file="db/changelog/scripts/apply_default_usernames_to_users.sql"/>
Rerun your app. You will see all users are now populated with a default random 10 chars string. After all migration scripts, your users’ table looks this way:

Conclusion
Now you know how to use a migration tool like Liquibase in your Spring Boot project. Such migration tools are extremely useful when you develop an app. They help you automate the data migration process and eliminate a lot of issues related to data changes that might occur anytime during the development process.
Check out more useful sources on GitHub
