Choosing a right messaging system during your architectural planning is always a one of the key points. During my experience I tried out different solutions. And recently I decided to go with Apache Kafka, as the best option among others. Why do I choose it?
Apache Kafka:
- is scalable
- is fault-tolerant
- is a great publish-subscribe messaging system
- has better throughput in comparison to most messaging systems
- is highly durable
- is highly reliable
- offers high performance
So everything is on behalf of Kafka, and that’s why in my projects I decided to use this awesome tool.
And my reason of writing this article — is to provide a step by step guide on how to include Apache Kafka into your Spring Boot application and to start using it’s benefits.
Prerequisites:
- The article requires to have Apache Zookeeper and Kafka
- Go to https://docs.confluent.io/current/installation/installing_cp/zip-tar.html#prod-kafka-cli-install
- Download the source
- Unzip it
- Follow the step-by-step instruction from the website, and you’ll get Kafka up and running in your local environment
What you’ll get after this guide:
As a result of reading this article you will have a Spring Boot application that will have Kafka Producer to publish messages to Kafka queue, and Kafka Consumer to catch and read messages.
Okay. I think we are ready to start!
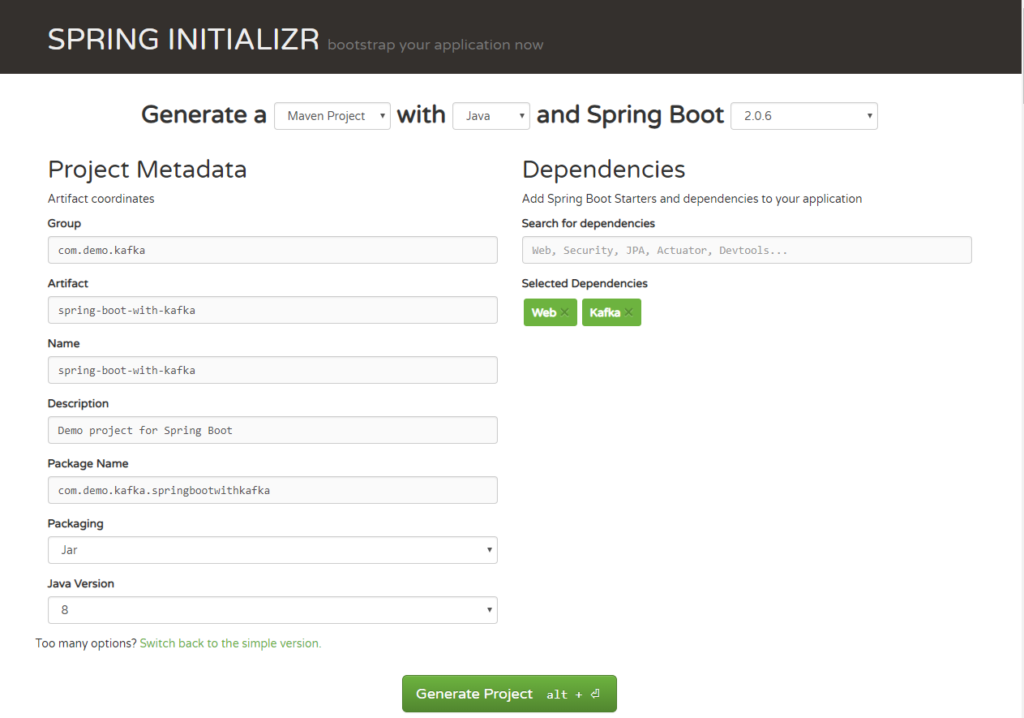
First of all, let’s go to theSpring Initializrwhere we are going to generate our project, that will basically have support for Web, and Kafka.

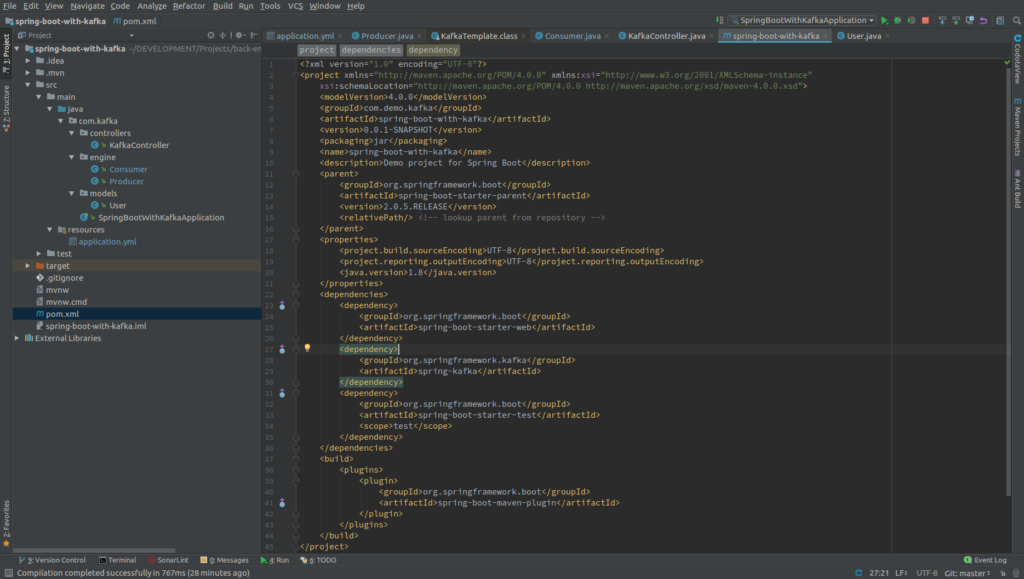
Once you unzipped the project, you’ll have a very simple structure. So I’ll show you how the project will look like at the end of this article, so you could easily follow the same structure.

Alright, now you see it and we can move forward.
In this article I wan’t to show you how to publish/read messages from the Kafka queue.
So, let’s create simple java class, that we will use for our example:
package com.kafka.models;public class User { private String name; private int age; public User(String name, int age) { this.name = name; this.age = age; }}Next, we need to create the configuration file. We need to somehow configure our Kafka producer and consumer to be able to publish and read messages from the queue.
server:
 port: 9000spring:
  kafka:
    consumer:
      bootstrap: localhost:9092
      group-id: group_id
      auto-offset-reset: earliest
      key-deserializer: org.apache.kafka.common.serialization.StringDeserializer
      value-deserializer: org.apache.kafka.common.serialization.StringDeserializer
     producer:
       bootstrap: localhost:9092
       key-serializer: org.apache.kafka.common.serialization.StringSerializer
       value-serializer: org.apache.kafka.common.serialization.StringSerializer
ConsumerFactory has almost the same configs as ProducerFactory, but we also need to set up a group ID. Almost every time you start a new consumer, you need to assign some group ID to it. And we actually just did it.
OK. The most interesting part of any project — configuration — is complete. ? Now, we can move on to the business logic, which is going to be ridiculously simple.
Ok. “The most interesting part” of any project — configuration — is completed? Now we can move to the business logic, which is going to ridiculously simple.
Let’s create a Producer, that will push our message to the queue.
@Service
public class Producer {private static final Logger logger = LoggerFactory.getLogger(Producer.class);private static final String TOPIC = "users";@Autowired
private KafkaTemplate<String, String> kafkaTemplate;   public void sendMessage(String message) {
      logger.info(String.format("#### -> Producing message -> %s", message));
      this.kafkaTemplate.send(TOPIC, message);
   }
}
So, here we autowired KafkaTemplate, and we will use this instance to publish messages to the queue.
That’s it for producer! Let’s move to Consumer — the service that will be responsible for catching messages and further handling(based on your own logic)
@Service
public class Consumer {

    private final Logger logger = LoggerFactory.getLogger(Producer.class);
    @Autowired
    private final ObjectMapper mapper = new ObjectMapper();

    @KafkaListener(topics = "users", groupId = "group_id")
    public void consume(String message) throws IOException {
        logger.info(String.format("#### -> Consumed message -> %s", message));
    }

}
Here we told our method void consume(String message) to catch every message from users queue, and we just log it out. But in your real application you can handle it in the way your business requires to.
So, if we already have a consumer — that’s all what we need to be able to consume Kafka messages.
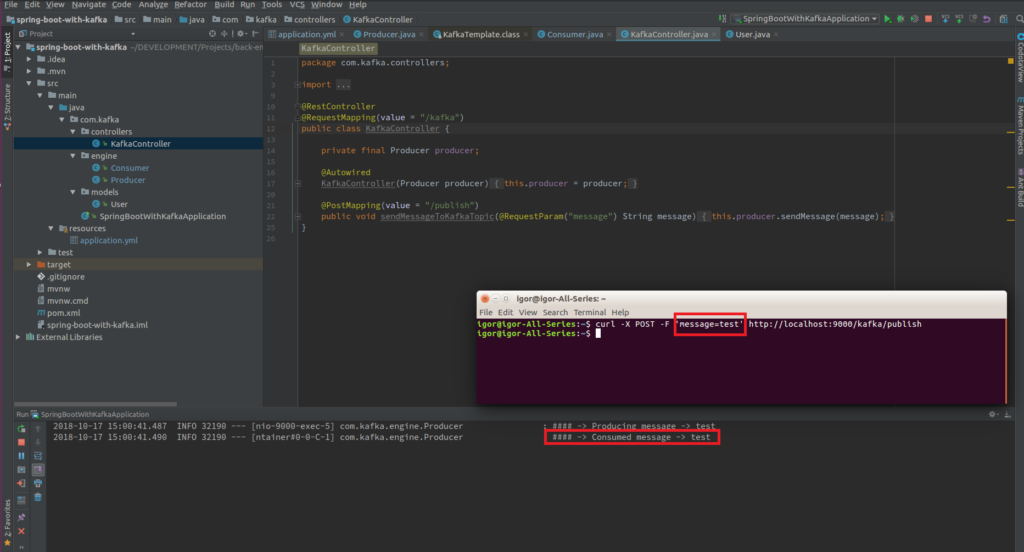
And to show you how that’s working — I’ll create a REST controller, that will expose single endpoint, using which we will send message through Postman → then it will go to Producer, which will publish it to Kafka queue → and then our Consumer will catch it, and handle the way we set up — just log to the console.
@RestController
@RequestMapping(value = "/kafka")
public class KafkaController {

    private final Producer producer;

    @Autowired
    KafkaController(Producer producer) {
        this.producer = producer;
    }

    @PostMapping(value = "/publish")
    public void sendMessageToKafkaTopic(@RequestParam("message") String message) {
        this.producer.sendMessage(message);
    }
}
Let’s send our message to Kafka using CURL:
curl -X POST -F ‘message=test’ https://localhost:9000/kafka/publish

So, basically that’s it! Here is the simple example that should help you to understand how that is easy to add Apache Kafka to your Spring Boot project.
As usual, all the source code available on my GitHub account.
Thank you for your reading, hope you enjoyed the information ?


